
Wednesday, December 21, 2011
Cardboard Gingerbread Man/Girl Ornament!
Gingerbread Ornament - Trace a gingerbread man/girl onto cardboard and cut it out. I used my gingerbread man cookie cutter as a template. Glue on decorations. I used foam stickers and googly eyes. I tied a ribbon for the neck and added a bell to the ribbon. Draw a smile for the gingerbread man/girl. Glue a string on the backside to make into an ornament!
 Materials Needed:cardboard, pencil, scissors, foam stickers, glue, googly eyes, marker, ribbon, small craft bell, any other decorations you would like to use!!
Tuesday, December 13, 2011
Rudolph Handprint Reindeer!

Materials Needed: brown paper, scissors, brown paint, paint brush, brown crayon or marker, googly eyes, red pom-pom, pink and red crayon, glue
Monday, December 12, 2011
Christmas Mouse!
Project: Christmas Mouse - Cut three circles from brown paper. Cut out three smaller circles from pink paper. Glue the three pink circles to the middle of the brown circles. Arrange and glue together the 3 circles to make a mouse head. Cut a triangle hat out of red construction paper. Glue to the mouse head. Glue cotton balls to the hat to make the hat look like a Santa hat. Glue on googly eyes. Draw a nose, whiskers and mouth. Attach yarn to the back of the mouse for a hanger.
 Materials Needed: brown, pink, red construction paper, scissors, googly eyes, black marker, cotton balls, glue, yarn

Wednesday, December 7, 2011
Christmas Peppermints!
Project: Christmas Peppermints - Divide a small paper plate into eighths with a black marker. Color every other section with a red crayon. Cover the plate with clear plastic wrap. Secure with tape on the back of the mint/plate. Twist ends and secure with tape to make the wrapper.
 Materials Needed: small paper plate, black marker, red crayon, clear plastic wrap, tape

Tuesday, November 22, 2011
Turkey Cookies!
 I saw this recipe for turkey cookies in a Taste of Home cookbook. I modified the recipe by using malted milk balls instead of chocolate covered cherries!
Directions: Attach malted milk balls - or chocolate covered cherries to fudge striped cookie with frosting. Position the other cookie perpendicular to each base (the cookie with the malted milk ball on it). Attach candy corn to the front of each malted milk ball with chocolate frosting.
Ingredients: fudge striped cookies, chocolate frosting, malted milk balls or chocolate covered cherries, candy corn

Monday, November 14, 2011
Styrofoam Ball Turkey!
Styrofoam Ball Turkey - Paint 2 different size Styrofoam balls brown and let them dry. Attach the Styrofoam balls together with a toothpick. Glue on orange, foam feet. Glue on 2 googly eyes. Cut 1/4 inch pieces from orange and red chenille stems. Stick the orange piece into the top, painted ball for a beak. Stick the red piece just above and to the side of the beak. Poke different colored feathers into the bottom, painted ball for the turkey's feathers.
 Materials Needed: brown paint, paint brush, 2 different size Styrofoam balls, toothpick, orange craft foam, glue, googly eyes, red and orange chenille stems, feathers

Monday, November 7, 2011
Cardboard Tube Turkey!
Cardboard Tube Turkey - Cut a cardboard tube into a 6-7 inch section - I used the tube from clear plastic wrap. Cut orange feet from orange craft foam. Apply layer of glue to the bottom of the cardboard tube and press onto the orange feet. Cut a beak shape from the orange craft foam. Glue onto the tube. Cut a 1 inch piece from a chenille stem and bend into an upside down L. Glue the chenille stem onto the tube, so it sits around the beak. Glue on two googly eyes. Put a layer of glue on the top, inside of the cardboard tube and glue colored feathers in place.
 Materials Needed: cardboard tube, scissors, orange craft foam, red chenille stem, googly eyes, feathers, glue

Thursday, October 27, 2011
Jar-o'lanterns!

Directions: Cut masking tape into jack-o-lantern face shapes and stick to a jar. Paint the jar orange and let dry. Carefully, remove the tape shapes. Light the jar-o'lantern with a tea light or battery operated tea light.
Materials Needed: clean jar, masking tape, scissors, paint brush, orange paint, tea light
Monday, October 24, 2011
Candy Corn Necklace
Candy Corn Necklace - Trace candy corn shape onto white paper, Cut out orange, yellow and white craft foam sections for the candy corn neclace. Glue the colored pieces to the candy corn shape. Let dry. Punch hole in the top of the candy corn and string ribbon through to make necklace.
 Materials Needed: white paper, pencil, scissors, orange, yellow, white craft foam, hole punch, orange ribbon

Friday, October 21, 2011
Feather Pumpkin!

Materials Needed: white cardstock, pencil, orange feathers, glue, black craft foam, scissors
Wednesday, October 19, 2011
Cardboard Tube Ghost!

Cardboard Tube Ghost! Paint a cardboard tube - about the size of a toilet paper roll tube - white. Let dry. Trace a ghost shape onto white craft foam and cut out. Glue on googly eyes. Draw a mouth with black marker. Staple to painted cardboard tube.
Materials Needed: cardboard tube, white paint, paintbrush, scissors, white craft foam, googly eyes, black marker, stapler
Monday, October 17, 2011
Ghost Wreath!

Ghost Wreath: Cut out ghosts from white paper. Decorate each ghost. Cut out the center from a paper plate to make a wreath. Glue ghosts to the wreath. Cut out 1 to 2 pumpkin shapes from orange construction paper. Decorate the pumpkins. Glue pumpkins to the wreath. Staple orange ribbon to the back of the wreath as a hanger.
Materials Needed: white paper, orange paper, scissors, markers, ink pad, googly eyes, orange ribbon, stapler, paper plate

Friday, October 14, 2011
Edible Acorns!

Edible Acorns - This project comes from Family Fun Magazine. Dip Hershey's Kisses into chocolate frosting and attach to underside of mini Nilla Wafers. Dip skinny pretzels into chocolate frosting and stick to top of mini Nilla Wafers (I broke pretzels into little pieces).
Materials Needed: mini Nilla Wafers, Chocolate Kisses, pretzels, chocolate frosting

Addie and Ty making the acorns!
Thursday, October 13, 2011
Autumn Banner!

Materials Needed: fall stickers, brown craft felt (5x7 size), 2 buttons, needle and thread, orange ribbon
Tuesday, October 11, 2011
The Letter Ee
The Letter Ee!

Elephant Shapes - This project comes from the http://www.first-school/ website. We talked about shapes and made an elephant to go with our letter Ee.

Ee is for Elephant - I don't have a picture of this, but I printed off block letter E and e from the dltk-kids website. Addie glued pictures of Elephants onto upper and lower case letter E. We cut out the letters and glued them to a piece of construction paper.
Monday, October 10, 2011
Cardboard Tube Bat!
Cardboard Tube Bat: Paint a cardboard tube black - we used a tp roll. Cut out a bat shape from black craft foam. Staple the bat onto the painted tube. Glue on googly eyes.
 Materials Needed: cardboard tube, black paint, paint brush, black craft foam, scissors, stapler, googly eyes

Wednesday, September 28, 2011
The Letter Aa


Addie made an Acorn Man for one of her letter A activities. I traced the template pieces onto brown paper and cut them out. Addie glued the Acorn man together on yellow paper.

Tuesday, September 20, 2011
Painted Leaves!

Materials Needed: yellow and green construction paper, orange paint, paper towel, scissors, glue
Monday, September 19, 2011
Apple Sun Catchers!

Apple Sun Catchers: Cut an apple shape out of clear Con-Tact paper. Make sure to cut out 2 identical apples. Remove the backing from one of the apples. Tear small pieces of red or green tissue paper and press onto the sticky side of the Con-Tact paper. When finished seal with other half of apple. Cut a small, brown, rectangle for brown construction paper and attach to the apple. Hang in the window.
Materials Needed: Con-Tact paper, red or green tissue paper, scissors, brown paper

Tuesday, September 13, 2011
Rock Leaf Print

Rock Leaf Print: Find a medium to large size flat rock. Clean and let dry. Paint a leaf either orange, red or yellow. Press the leaf onto the rock. Let dry. Seal with spray sealer.
Materials Needed: rock, paint, paint brush, leaf, Polyurethane Sealer
Wednesday, August 31, 2011
Handprint Apple Tree!!

Monday, August 29, 2011
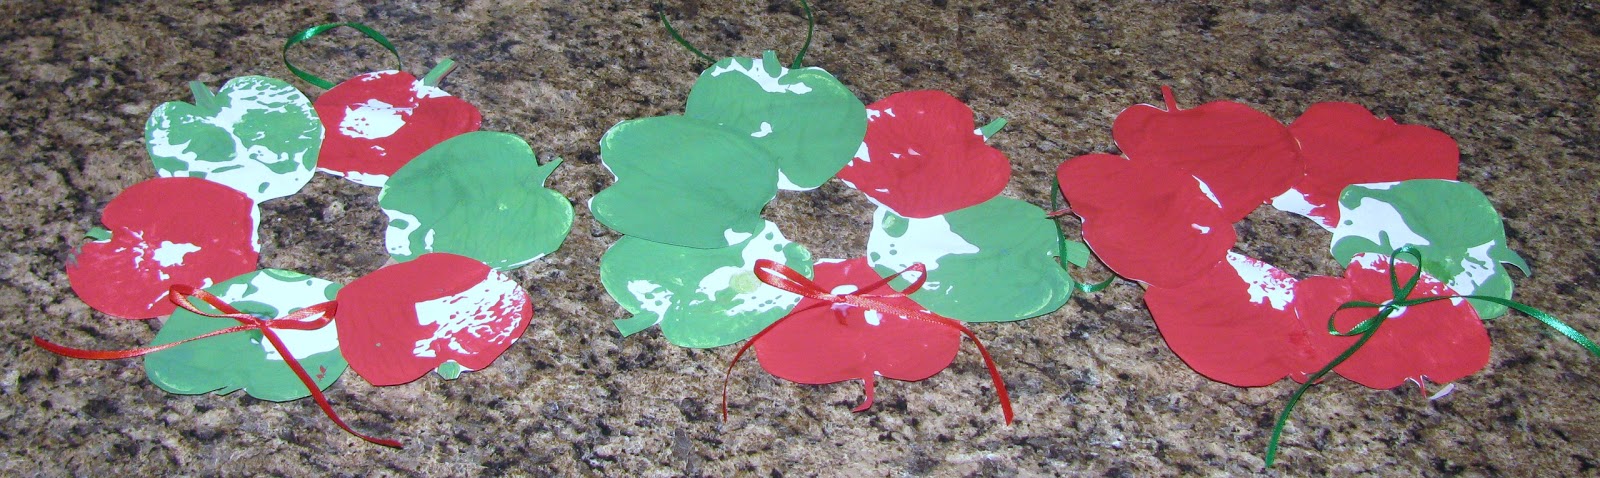
Apple Print Wreath!
Thursday, August 4, 2011
First Name Ice Cream Cones!
Project: First Name Ice Cream Cones - Trace hand on construction paper and cut out. Cut cone shape out of brown construction paper. Glue hand print to cone. Use foam stickers to make first name and attach to the ice cream.
 Materials Needed: colored construction paper, brown construction paper, scissors, foam stickers, glue stick

Wednesday, August 3, 2011
Milk Cap Bugs!

Directions: Cut a set of heart-shaped wings out of a plastic jug. Hold the wings in place on top of a plastic cap - I used milk carton caps. Use push-pins to make two holes through both. Fold an 18-inch length of floral wire in half and thread the ends through the holes. Then twist the wires to secure them into place. For the eyes, use a hole puch to make black craft-foam pupils, and use scissors to cut larger circles from white craft foam. Attach the yeas to the cap with a 4-inch lengh of floral wire just like before.
Materials Needed: milk carton caps, plastic jug, floral wire, push pin, black and white craft foam, hole punch, scissors
Tuesday, August 2, 2011
Jelly fish!

Thursday, July 28, 2011
Plastic Cup Lighthouse!

This project is from the August 2011 issue of Family Fun Magazine. My 6 year old son was looking through the magazine and said, "Mom, we have to make this!" It was very easy to make and Connor was able to do most of it all by himself!
Plastic Cup Lighthouse - Apply white tape around a red plastic cup (in three different sections) Cut out black rectangles - 1 larger one for the door and 2 smaller ones for the windows. Glue to the cup. Trace the bottom of a clear plastic cup onto black paper. Cut the circle out and glue to the bottom of the cup. Cut a 1 inch section off the top of a clear plastic cup. Place rechargeable tea light on top of red plastic cup and cover with cut clear plastic cup.
Materials Needed: red plastic cup, clear plastic cup, black paper, white tape, scissors, rechargeable tea light, glue, pencil
Friday, July 8, 2011
Foamerator!!
Project: Foamerator - This project if from Family Fun Magazine. Directions: Cut the bottom off of a plastic water bottle. Cut a square from a towel (enough to amply cover the bottom of the water bottle. Use a rubber band to secure the towel over the bottom of the water bottle. Place dish soap and water into a shallow pan/tub. Dip the water bottle, towel side down into the dish soap and water. Then blow on the mouth of the water bottle to create bubble foam!! Connor, Ty and Addie had a blast with all of the foamy bubbles!
![]()
![]() Materials Needed: plastic water bottle, scissors, towel, rubber band, dish soap, water, pan/tub
Materials Needed: plastic water bottle, scissors, towel, rubber band, dish soap, water, pan/tub


Thursday, July 7, 2011
Under the Sea Picture!

This idea comes from the June/July 2007 issue of the Mailbox Magazine (Kindergarten/Grade 1)
Project: Under the Sea Picture - Fill a shallow pan with enough water to cover the bottom. Use a scissors to scrape shavings of blue chalk into the water covered pan. Dip a shell template in the chalk-water. Let Dry. Sponge paint the bottom of a white piece of paper with yellow paint (the sand). Use blue crayon to water on the top half of the white paper. Glue the shell onto the paper and add additional sea components - like seaweed and other sea creatures.

Friday, June 24, 2011
Cleo the Crab!
This idea comes from the June/July 2007 Kindergarten/1st grade issue of The Mailbox Magazine
![]()
![]() Project/Learning Activity: Cleo the Crab. Cut a crab out of red construction paper - start with a semi-circle then two sets of legs, and two claws. Glue the crab to the top of a piece of paper. Brainstorm ideas the the crab can hold with his claws. Connor chose a flashlight and Ty chose a fork. Make the item out of construction paper and glue it in the crab's claw. Develop a sentence from the item and write the sentence below the crab. Materials Needed: red construction paper, scissors, glue stick, white paper, pencil, construction paper
Project/Learning Activity: Cleo the Crab. Cut a crab out of red construction paper - start with a semi-circle then two sets of legs, and two claws. Glue the crab to the top of a piece of paper. Brainstorm ideas the the crab can hold with his claws. Connor chose a flashlight and Ty chose a fork. Make the item out of construction paper and glue it in the crab's claw. Develop a sentence from the item and write the sentence below the crab. Materials Needed: red construction paper, scissors, glue stick, white paper, pencil, construction paper


Thursday, June 23, 2011
What do you see under the sea?

Wednesday, June 22, 2011
Lantern Fish!
We are doing an under-the-sea unit this week. Today, we made lantern fish. This project comes from the The Mailbox Magazine June/July 2007 Kindergarten-1st grade.
Project: Lantern Fish - Cut a fish shape out of blue construction paper. Dip a cotton ball into white paint and press onto the fish multiple times. Dip the end of a cotton swab into yellow paint and swirl it in the middle of the white paint spots to make lanterns.
![]() Materials Needed: blue construction paper, white and yellow paint, cotton swabs, cotton balls, scissors
Materials Needed: blue construction paper, white and yellow paint, cotton swabs, cotton balls, scissors
Project: Lantern Fish - Cut a fish shape out of blue construction paper. Dip a cotton ball into white paint and press onto the fish multiple times. Dip the end of a cotton swab into yellow paint and swirl it in the middle of the white paint spots to make lanterns.

Tuesday, June 21, 2011
Name Flowers!
Learning Activity/Project: Name Flowers - Cut circles and petals from construction paper. Cut a stem and leaves from green construction paper. Write name on circle. Write words on each petal that begin with the same letter as your name. Glue together to make a name flower.
![]() Materials Needed: construction paper, scissors, glue stick, marker
Materials Needed: construction paper, scissors, glue stick, marker

Friday, June 10, 2011
Symmetrical Butterfly!
Project: Symmetrical Butterfly! Cut a butterfly shape out of white paper and fold in half. Paint one half of the butterfly with paint. Fold the butterfly in half and press the two halves together. Unfold and let dry!
 Materials Needed: white paper, paint, paint brush, scissors

Wednesday, June 8, 2011
Butterfly Book!
Connor is done with Kindergarten and excited for summer vacation. Today was his first day home with us - he was able to sleep in and do projects with us again!!
Project: Butterfly Book! (Source: The Mailbox Magazine - Kindergarten-Grade 1, April/May 2007)
In advance make a supply of white butterfly-shaped pages. Make a colored butterfly-shaped cover for the books. Cut out a butterfly shaped body and two antennae out of black paper.
1. Brainstorm adjectives to describe butterflies.
2. Give each child a page and have him create a butterfly illustration.
3. Help him complete the following prompt - _____________'s butterfly is _______________.
4. Bind the book or books together and title the book and decorate the front cover.


*You can make one book or individual books for each child.
Wednesday, June 1, 2011
ABC Book!

Ty has been making this ABC book for the last couple of months. Every time he mastered a new letter of the alphabet we added a page to his ABC book. We finished the book up today, and I am glad to say that Ty now knows all of his uppercase letters!!
ABC Book: Cut 8 1/2 x 11 pieces of paper in half. Write each letter on the top of the half sheets of paper. (Aa if for . . . . Bb is for . . . . and so on) Cut pictures out of magazines, draw pictures or print pictures of different items to correspond with the sound of each letter. (A - apple, airplane. B - ball, basket, bread and so on) You can add a cover to the book once all of the pages are complete.


Subscribe to:
Posts (Atom)