Wednesday, October 27, 2010

Paper Plate Jack-O-Lantern

The theme this week is Halloween!
Project: Paper Plate Jack-O-Lantern I used a large paper plate and trimmed it down using the inside circle as my guide. Using a large paper plate allows the jack-o-lantern to have a stem, but you could use a small paper plate for this project. Directions: Cut a pumpkin shape out of a large paper plate, using the inside circle as the template. Make sure to cut a stem into your shape. Rip orange and green construction paper into pieces. Stick the ripped paper onto the pumpkin using a glue stick. After the pumpkin is covered, cut out jack-o-lantern features and glue them on to the pumpkin.
Materials Needed: paper plate, orange, black and green construction paper, glue stick, scissors

Monday, October 25, 2010

Button Spiders and Glitter Spider Web!

The theme this week is Halloween!
Project: Button Spiders and Glitter Spider Web! I was inspired by Addie's shirt today. She is wearing a hand-me-down Halloween shirt from her big brother Connor. The shirt has cute black button spiders sewed , so I decided to have Ty make button spiders. He glued buttons on white card stock and drew eight legs on each spider. Then he drew a line (web) from the top of the paper to each button. Next, I drew a spider web with white glue and Ty sprinkled purple glitter over the spider web. Finally, Ty added two more button spiders to the purple web! Materials Needed: black buttons, black marker, glue, glitter

Friday, October 22, 2010

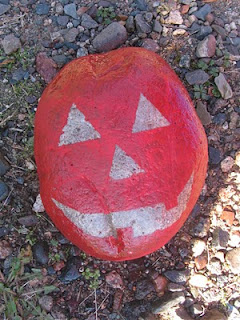
Jack-O-Lantern Rock!

Addie's Rock

Ty's Rock
The theme this week is Halloween!
Project: Jack-O-Lantern Rocks! This project was inspired by a rock painting project that my dear friend Nichole featured on her blog http://www.minimatisse.blogspot.com/ She is an amazing mom, friend, teacher and artist!! Thanks for the inspiration Nichole!! Ty and Addie loved painting their rocks and then peeling off the tape to reveal their very own jack-0-lantern rock.

Directions: Cut jack-o-lantern features from painters tape and fasten to rock. Paint the whole rock orange. Let dry, then remove tape pieces. Spray with sealant if you want to leave the rock outside. I used a polyurethane varnish spray! Materials Needed: rock, paintbrush, orange paint, painters tape, scissors, varnish spray

Tuesday, October 19, 2010

Puffy Paint Ghost!!

Ty's Ghost Connor's Ghost (not dried)
The theme this week is Halloween!
Project: Puffy Paint Ghost! I saw this craft at http://www.notimeforflashcards.com/
Directions: Mix together 3/4 cup of shaving cream, 1/4 cup of glue. Draw a ghost shape onto a paper bag or cardboard or tagboard. Spread the mixture over the ghost shape - Ty had a lot of fun spreading the mixture with his hands!! Cut a mouth shape out of black construction paper and press onto the ghost. Press googly eyes onto the ghost. Let Dry. When dry cut out the ghost! Materials Needed: paper bag/cardboard/tagboard, shaving cream, white glue, black construction paper, googly eyes, scissors, black marker

Thursday, October 14, 2010

Cardboard Tube Monster!!

The theme this week is Halloween!
Project: Cardboard Tube Monster. I saw this craft on the website http://www.notimeforflashcards.com/ I thought it was adorable, so we had to try it!! Directions: Paint the top 1/4 of cardboard tube black and the rest green. When dry cut slits in the black part for hair. Glue on googly eyes, draw mouth and nose. Poke golf tees into each lower side for the monster's neck screws!! Connor and Ty had a blast making their monsters!!
Materials Needed: cardboard tube, green, black paint, scissors, googly eyes, black marker, 2 golf tees

Monday, October 11, 2010

Thumbprint Spiders!


The theme this week is Halloween!
Project: Thumbprint Spiders! Cut white paper in half and draw black lines from the top of the paper at varying lengths down to the middle of the paper. Press thumb into black ink and make prints on the end of each line. Draw eight legs on each spider!
Materials Needed: white paper, black marker, black ink

Saturday, October 9, 2010

Monster Feet!


Connor's Monster
The theme this week is Halloween!
Project: Monster Feet! Directions: Paint toes black and the rest of the foot green. Press the painted foot onto white paper. When dry, trim around the footprint. Draw a nose and mouth. Glue on googly eyes. Cut bolts from purple construction paper and glue to the monster!
Materials Needed: green and black paint, paint brush, white paper, scissors, marker, purple construction paper, glue stick, googly eyes (Source: The Mailbox Magazine October/November 2009 - Preschool)

Ty's Monster

Tuesday, October 5, 2010

Trick-or-Treat Smell Our Feet!

Ty's Ghost Tana's Ghost Addie's Ghost
The theme this week is Halloween!
Project: Ghost Footprints - I saw this project in The Mailbox Magazine October/November 2009 (preschool). The original idea was for a bulletin board. I don't have a house full of preschoolers, so we just made individual ghosts on individual pieces of construction paper. Directions: Paint foot white and press onto black paper, sprinkle with cinnamon. When dry trim around the footprint and paste onto orange construction paper. Draw eyes and mouth. Write "Trick-or-Treat Smell my feet!" on the top of the orange paper.
Materials Needed: white paint, paint brush, black and orange paper, cinnamon, scissors, black marker

Friday, October 1, 2010

Coloring a Scarecrow!

Addie's Scarecrow Ty's Scarecrow
The theme this week is Fall!
Project: Coloring a Scarecrow! There is nothing fancy or exciting about this project - just regular old coloring. We have been working on staying patient enough to complete a full coloring page. So, I decided to print off a scarecrow and have Ty (and Addie) do their best work. Of course, Ty is more patient and has a longer attention span than 2 year old Addie, but I think they both did a great job with their scarecrows! I also had Ty cut around his scarecrow and glue it to a half sheet of orange construction paper. He did a wonderful job!!
Materials Needed: scarecrow coloring page, crayons, glue stick, scissors, construction paper