Tuesday, October 15, 2013

Fall Fun!

Fall Fun
Projects 
Stamped Cork Fall Tree
Cut a tree trunk from brown paper
Prepare red, yellow and orange paint and 3 wine corks
Directions: 
Glue the tree trunk to a piece of white paper.
Press the corks into the paint and press onto the paper to make leaves!

Ripped Paper Fall Tree
Cut a tree trunk from brown construction paper
Type and print:  In the Fall, the leaves fall off the tree!
Directions:
Rip small pieces of red orange and yellow construction paper
Glue the tree trunk to a 5x7 piece of blue construction paper
Glue the "leaves" to the tree
Glue the poem to the bottom of the tree
 
Fall Leaf Man
Cut out a leaf shape
Cut out strips of black paper for the arms and legs- accordion fold the strips of paper
Type and print:  If I were a leaf, I would . . .
Directions: 
Glue googly eyes to the leaf
Draw a mouth and nose on the leaf man
Finish the sentence
Staple the arms and legs on the leaf man
Staple the finished sentence to the leaf man


Learning Activities 
Pumpkin Seed Counting Story
Skills:  MathCounting, one-to-one matching, number recognition
Here is the link to this printable book
We used a light pink stamp pad to make the pumpkin seeds on each page


 Leaf Counting Book
Skills:  number writing, counting,  number recognition, name writing
Trace and cut out out a leaf shape to make this book
Directions:
Write the numbers 1-5 on the top of the leaves
Stick the appropriate number of  fall sticker/s on each page
Write your name and  1-5 on the cover
 
 
Acorn Shape Match
Skills:  shape recognition, matching, pasting
Cut acorn shapes from brown and tan construction paper - brown for the top and tan for the bottom.  Draw matching shapes on the top and bottom of each acorn
Directions:
Match the shapes and glue the acorns to the paper

Acorn Number Match
Skills:  number writing, one-to-one correspondence, number recognition, counting,
This is a variation of the acorn shape match
Directions:
Roll two die and add them together
Write the sum on the top part of the acorn
Draw the same number of dots on the bottom of the acorn
Glue the acorn halves to a piece of paper
 
  
Fall Tree Words
Skills:  sight word reading, gluing
Trace hand on a blue piece of paper - color with brown marker
Cut out different colored leaves (I did 6 leaves)
Write sight words on the leaves
Directions:
Read each leaf and then glue it to the tree


Monday, September 30, 2013

Apple Fun!

Apple Fun
Projects/Learning Activities
Apple Mobile
Skills:  pasting, following directions, color recognition
I had a template for this -from who know where!
I traced and cut out two of each piece.  Tana and Addie cut out some of the pieces too.
We taped a piece of yarn down the middle of each piece and then glued the matching pieces on top to create the apple mobile!
 Book Connection
Apple Trouble
By: Ragnhild Scamell and Mechael Terry
 
Craft Stick Apple
Skills:  Gluing,  writing name, counting
Glue 6 red, craft sticks to a piece of tagboard (just enough to keep the craft sticks secure)
Cut a stem from green, craft foam and glue onto the craft sticks
Write child's name on the bottom
 
a is for Apple!
Skills: 
 lowercase a, letter writing, writing, color recognition, cutting, pasting, counting, following directions
Draw a lowercase a onto red, construction paper
Draw a leaf and stem shape onto green and brown construction paper
Cut out 5 seeds from black construction paper
Directions:
Cut the letter a out
Cut out the stem and leaf
Glue the a and stem and leaf to a piece of white construction paper
Glue the 5 seeds in the "belly" of the a
Write - a is for . . . .
 
Paper Plate Apple Core!
Skills:  painting, counting, following directions, color recognition
Cut a paper plate to look like an apple core
Cut out brown stems and green leaves
Directions: 
Pain the top and the bottom of the plate red
Press fingertips into a black ink pad to make the seeds
When dry, staple the stem and leaf to the top of the apple core
Book Connection
The Fall Festival
By Mercer May

Tuesday, September 24, 2013

My Name!

My Name
Projects/Learning Activities
Name Train
Skills:  name recognition and forming
pasting, counting, square identification, following directions
Print and cut out a train engine (or draw one!)
Cut out different colored construction squares for the boxcars.
Cut a 9x13 piece of construction paper in half
Gather foam letters for each child's name
Directions:
Glue the engine onto a half piece of 9x13 construction paper
Glue the box cars behind the engine - 1 for each letter of your name
Dip a glue stick cover into black paint and press onto each boxcar 2 times (the wheels)
Press your index finger into the paint and press into the middle of each circle.
Make your name - sticking the letters on the boxcars
 
Book Connection:  Chugga Chugga Choo Choo 
By: Kevin Lewis
 
Name Tree
Skills:  pasting, name writing, color identification, counting, following directions
Cut a brown tree trunk from construction paper
Cut leaves from colored construction paper (enough for the letters in your child's/children's name/s)
Directions:
Glue the tree trunk to a piece of construction paper
Glue the leaves around the tree trunk.
Write your name on the leaves - 1 letter for each leaf.
 
 
Book Connection: Leaf Trouble
By:  Jonathan Emmett 
Name Apple Prints
Skills:  name writing and recognition, following directions
Cut an apple in half
Dip the apple half into red paint and press onto a piece of green construction paper
Make the same number apple prints as letters in your name!
Let dry - write your name. 
 
Tana's Name Print!
 Book Connection:  Little Mouse and the Big Red Apple
By:  A.H. Benjamin and Gwyneth Williamson
 
Chicka, Chicka, Boom, Boom Names
Skills:  name recognition and ordering, following directions, counting, name writing, pasting
Cut out 4 green leaves/branches and fringe the edges
Cut out a brown tree trunk and accordion fold
Cut out two brown coconuts.
Type and print: 
Chicka, Chicka, Boom, Boom!
Will there be enough room?
________has _____
letters in his/her name!
Directions:
Glue the tree trunk onto yellow construction paper
Glue the 4 leaves/branches around the trunk
Glue the 2 coconuts in the middle of the trunk and branches
Stick the letters to your name around the branches and or trunk in order
Write your name on the line
Count the letters in your name and write that number on the line
Glue the poem to the bottom of your tree!
 
Book Connection: Chicka Chicka Boom Boom
By:  Bill Martin Jr. and John Archambault


Monday, September 16, 2013

Back To School

Back To School
Projects
Craft Stick Pencil
Paint one tip of a large craft stick pink
Paint the middle yellow
Let dry
Draw the lead with black permanent marker
Use a fine tip permanent marker to write each child's name
 
Name Pencil
Paint 4 small craft sticks yellow
Let dry and glue together
Cut a triangle out of tan craft foam
Glue the triangle to the painted craft sticks
Color in a black tip with black permanent marker
Add foam letters to spell out each child's name

 
Name Crayons
Cut a crayon shape out of colored construction paper.
Use black marker to decorate the crayon.
Draw an oval in the middle of the crayon and write or have the child write his/her name.
 
 
Learning Activities
Shape Buses
shape recognition, name Identification and writing, color recognition, gluing, cutting, following directions, counting
Cut out a yellow bus shape, 3 black squares, 1 long, black rectangle and 2 black circles. (Older children can cut out the bus and shapes by themselves)
On a 5x7 piece of colored construction  paper give the following directions:
Glue the bus on the paper.
Find the 3  squares and glue each square to the top of the bus.
Find the  rectangle and glue it underneath the squares.
Find the 2 circles and glue them to the bus for wheels.
Write your name on the bus.  (For older children)
Other questions:
What color is the bus?
Find the 2 circles:
Find the squares?
Find the rectangle?
Count the squares, the circles?
What color are the squares, rectangle and circles?
 

My Name Is : Buses
Name recognition, name writing, gluing, following directions, pasting, shape recognition
Create a page that says:  My Name Is: 
Leave a blank spot on the top of the paper for he bus
Cut out a small yellow square, a yellow rectangle - for the bus
3 black squares
Directions:
Glue the yellow rectangle onto the paper
Glue the yellow square in front of the rectangle
Glue the 3 black squares on the top of the bus - for windows
Dip a lid into black paint - we used a glue stick cover - press it on the bottom of the bus 2 times for the wheels. 
Dip your finger into the black paint and press it in the middle of each wheel.
Draw a line under the windows with black marker.
Write your name on the line.  (For younger children you will write the name)

 
Paper Backpacks
Writing, name recognition
Cut a backpack shape out of construction paper
Cut an oval out of construction paper
Cut 2 strips for the straps and 1 curved handle
Glue all pieces onto the back pack
EARLY PRESCHOOL:  Name recognition and making your name
Use foam letters to spell out  child's first name

PRESCHOOL - Type and print a form that says:  My favorite thing about school is

 
I am on the bus!
writing, drawing people, gluing, following directions, reading
Create a document that says:
__________ is on the bus (3x's)
I am on the bus!
Cut a bus shape out of yellow construction paper
Cut out 3 white squares - for the windows and 2 black circles - for the wheels
Have your child:
Glue the paper onto a piece of colored construction paper.
Brainstorm people who ride the bus.
Write names on the lines.
Read about who is on the bus
Glue the bus above their writing.
Glue the 3 white squares for the windows.
Glue the wheels on the bus.
Draw the people they named in their writing.
Draw a bus driver or themselves.
Write School on the bus
 
 
Songs
The Wheels on the Bus


Monday, August 26, 2013

Bugs! Bugs! Bugs!

 
Bugs! Bugs! Bugs!
Projects
Waterbottle Glo-Bugs
Wrap an empty, plastic water bottle in green construction paper
Secure with tape
Punch 4 holes into the green paper
Wrap chenille stems to make the feet and place them through the holes
Cut wings out from yellow construction paper
Decorate/color the wings
Staple the wings to the green construction paper
Glue on bead eyes or googly eyes
Wrap a chenille stem around the neck of the bottle to form the antenna
Place a Glow Stick inside the bottle
The Full Effect of the Glo -Bugs!
 
The finished products!
Craft Stick Fireflies
Glue one colored craft stick on top of two different colored craft sticks to make the body & the wings
Glue on googly eyes or beads (for the eyes)
 
Craft Stick Ladybug
Glue together 3 black craft sticks and 2 red craft sticks to make the body
Glue a black craft stick on top of the body
Add black dots to the red craft sticks
Glue on googly eyes and black pipe cleaners
 
Clothespin Fireflies
Decorate the top of a clothespin with markers
Glue 2 colored craft sticks - in an X on the clothespin to make the wings
Glue on 2 googly eyes  
 
 Milk Bottle Cap Bugs!
Draw a half moon with black permanent marker and color it in
Glue 2 googly eyes on the half moon shape
Draw dots/circles with a black, permanent marker
 
Clothespin Grasshoppers
Paint a clothespin - let dry
Cut 2 - 3 inch pieces and 2 - 6 inch pieces from  floral wire
Hot glue the ends of the 3 inch pieces on the front opening of the clothespin and the 2 6 inch pieces on the back of the clothespin opening
Glue a googly eye on each side of the clothespin
Bend the floral wire to create your grasshopper 
 
 
Learning Activities
Counting Lightning Bugs
Math - counting, one-to-one correspondence
Addition, plus one
Pre-K:  Say the number and add the appropriate number of "lightning bugs"
Kindergarten/1st Grade:  write in + 1 after each number
Find the sum and draw the lightning bugs
Here is the link to this activity
 
Addie doing the Pre-K activity
 

The Kindergarten + 1 Variation
 
Firefly Shake
Math - counting, addition, one-to-one correspondence
I don't remember where I got this activity from - Maybe The Mailbox Magazine ?
I have about a dozen of these Firefly pictures laminated that I keep in an old, clean PB jar along with the directions and dice. 
Directions:  Dump the Firefly pictures out on the floor
Roll the dice
Count the dots on the dice and pick up the same number of fireflies and place them in the jar.
When all of the fireflies are in the jar sing this song -
To the tune of Shoo Fly
Fireflies are fun to see
But now it's time to set them free!
(dump out the Fireflies and start again)
 

I modified this game to make it more difficult by using two dice and adding the numbers!
 
Insects - Observe and Draw!
Science - insects
Here is the link to this activity
I modified this activity by only doing a couple of the parts
 

 Observations

 Dragonfly Pictures
 

Wednesday, August 7, 2013

Fun With Experiments and Science!

 
Fun With Experiments and Science
Experiments
Absorbing Science
Fill 2 cups with water
Add blue dye to one cup and yellow dye to the other
Place an empty cup in between the two cups
Roll 2 paper towels
Place 1 end of the towel into the blue dye and one end of the other towel in the yellow dye
Bend both the towels and put the loose ends into the empty cup and watch to see what happens!
I had the kids make predictions and they were right - and amazed!
Before
 The colored water absorbs into the towel and travels up and then into the empty cup.  The blue and yellow dye's mix to make green water!!


After

Crazy Corks
Take a plastic bottle - we used a water bottle.
Use a funnel to add a spoonful of baking soda to the bottle.
Carefully, pour vinegar in the bottle.
Place a cork in the bottle and see what happens.
 
The vinegar and baking soda mix together to create a chemical reaction, creating carbon dioxide.   The gas in the bottle builds up and has nowhere to go, so it will eventually blow the cork right out of the bottle!

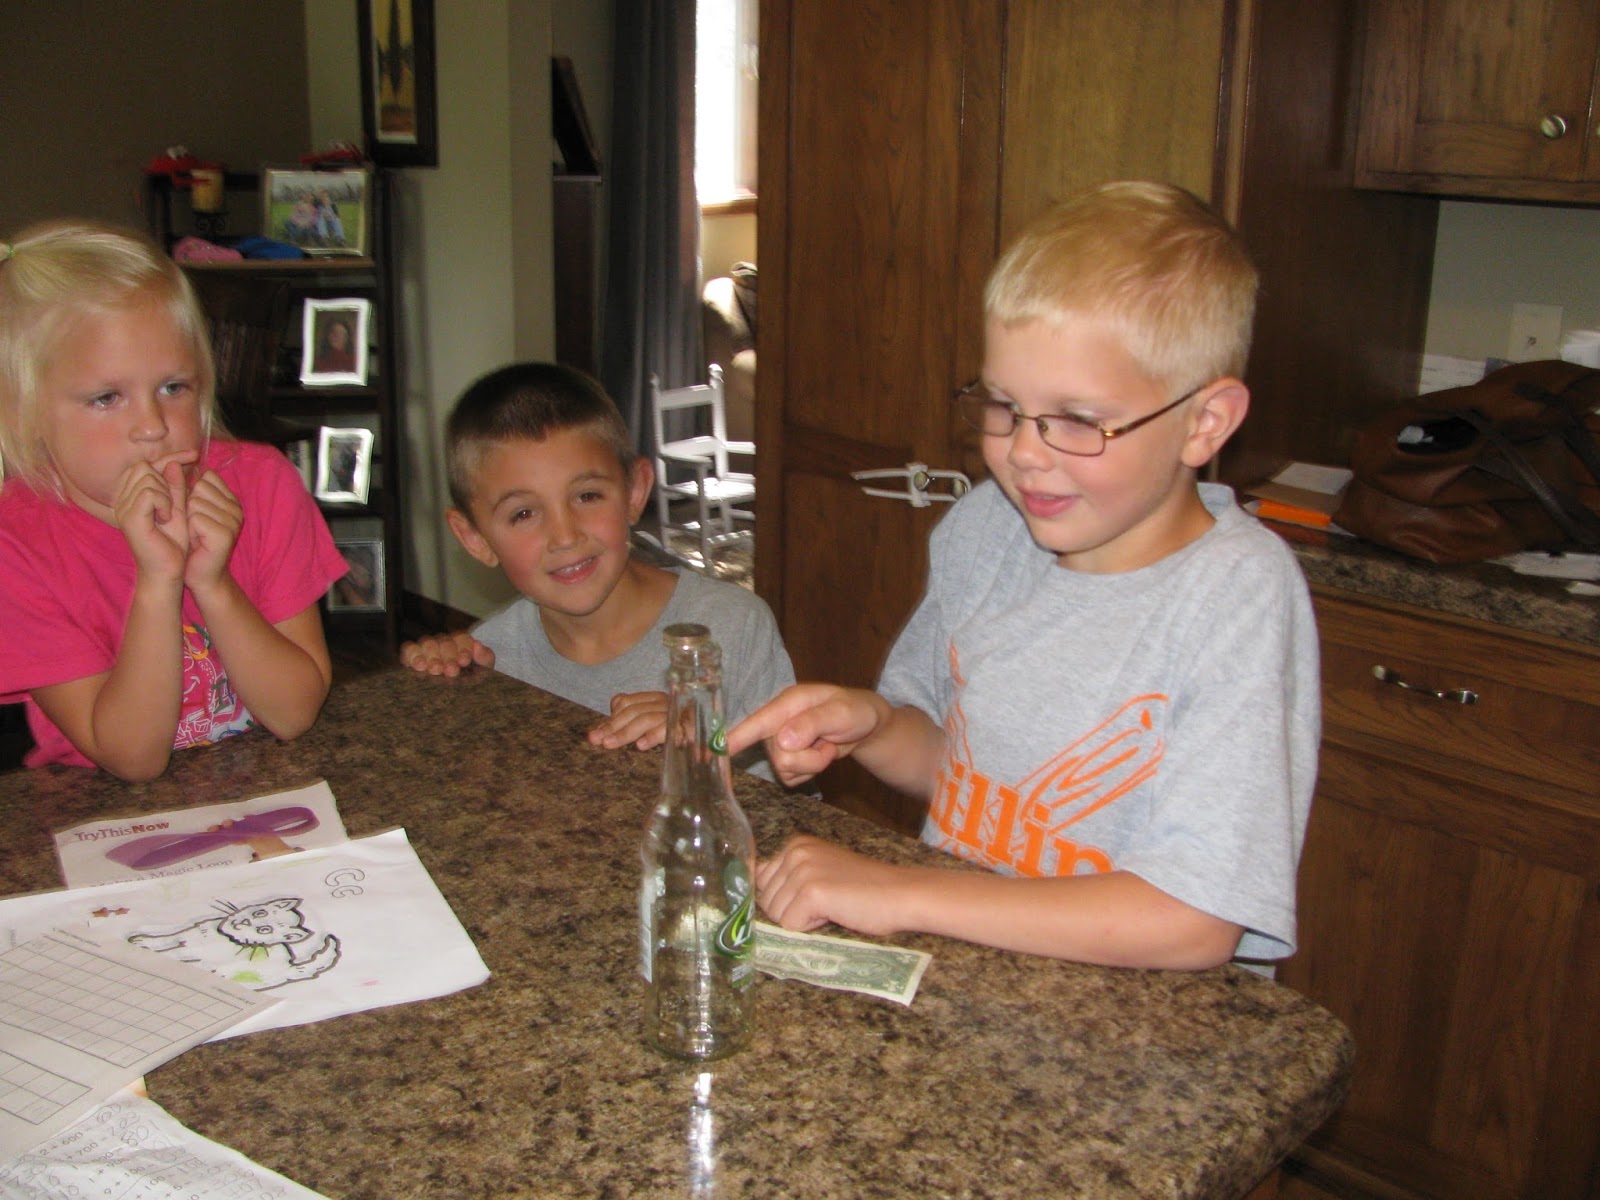
Flat George
This is from Family Fun Magazine - the February 2009 issue
You will need:
a crisp dollar bill
4 quarters
glass bottle with an opening smaller than the coins.
Set them up like the photo below
Use one finger to slip the dollar out without spilling the coins.
The set-up

Connor karate chopping the dollar bill
 

*This is how we did it*
Use your index finger to quickly strike the dollar bill near the quarters - like a karate chop
The coins will stay in place but the bill will slide out.
 
 Make a Magic Loop
This activity comes from the March 2006 issue of Family Fun Magazine
From a large piece of paper, cut a 2-inch-wide strip that is about 2 feet long
Bring the ends of the strip together to form a loop, but turn over one end before taping it to the other end

Cut the strip in half down the center.  You might expect to get 2 separate loops, but you don't!
Try to cut it down the center again and see what happens
 
 Adding a twist to the loop makes a shape called a Mobius strip. 
 
 
Make Your Own Bouncy Ball
In one bowl mix 1/2 tsp of borax and 2 Tablespoons of warm water - you can add food coloring if you like - this will be called your Borax Bowl
In the 2nd bowl dump in 1 tablespoon of white glue - this will be your Ball Mixture Bowl
Then add 1/2 tsp of the borax solution into the Ball Mixture Bowl
Next Add 1 Tablespoon of cornstarch to the Ball Mixture Bowl
Do Not Mix -  let it sit for 10-15 seconds
After 10-15 seconds mix until it becomes hard
Take the substance out of the bowl and knead it until it has become well molded and is formed like a ball
Store in a Zip-Lock bag so it doesn't dry out
 
Our mess and the supplies

                           The 3 kiddos with their bouncy balls                               The boys rolling and kneading their bouncy balls