Friday, July 30, 2010

Humpty Dumpty!

Day 2 of the week. The theme this week is Nursery Rhymes!
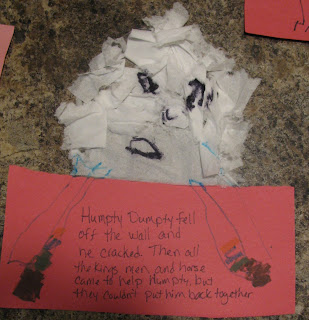
Project: Humpty Dumpty and a summary. We recited the Humpty Dumpty nursery rhyme a couple of time. Earlier, I had cut an egg-shaped piece out of clear Con-Tact covering. I removed the backing and attached a quarter piece of red construction paper to the sticky side.
After reciting the rhyme, the kids tore pieces of facial tissue and stuck them on the egg until it was covered. Next, they drew faces on their Humpty and arms and legs too. Finally, I had Connor and Ty tell me what happens to Humpty Dumpty and I wrote the words on the red construction paper. I saw this in the Pre-K Mailbox Magazine.
Materials Needed: Con-Tact paper, scissors, red construction paper, facial tissue, marker

Thursday, July 29, 2010

Sing a Song of Sixpence Pies!!

Day 1 of the week. The theme this week is Nursery Rhymes!
Project - Sing a Song of Sixpence Pies! I saw this in Pre-K Mailbox Magazine. We said the Sing a Song of Sixpence nursery rhyme and talked about what was in the pie in the rhyme. Then we brainstormed unusual ideas to be in pies. Connor decided to have Triceratops bones, Ty chose baseballs, and Addie chose baby dolls!! Directions: First, they glued a strip of aluminum foil (pie tin) to a sheet of construction paper. Then we stapled a brown, foam pie top above the tin to make a flap. Next, they drew what they wanted to come out of their pies. Then they dictated to me their appropriate rhyme and I wrote it below the tin. Materials Needed: aluminum foil, construction paper, brown foam or construction paper, glue stick, stapler, crayons, marker

Connor's Triceratops Bone Pie!

Thursday, July 15, 2010

Button Bookmarks!

Day 3 of the week. The theme this week is Buttons!
Project: Button Bookmarks. Connor and his Aunt Dani had craft time the other day. They decided to make bookmarks. Directions: Cut a 12 inch piece of ribbon and glue two buttons on each end of the ribbon. Add a sequin, sparkly bead or what ever to each side of the buttons! They bookmarks are adorable. Thank you Aunt Dani and Connor! Materials Needed: ribbon, scissors, buttons, sequins, craft glue

Wednesday, July 14, 2010

Button Magnets!

Day 2 of the week. The theme this week is Buttons!
Project - Button Magnets. Here is a fun and easy project for your preschooler! We glued cut-up pieces of tissue to soup can lids and then applied a thin layer of Mod Podge. Then we took buttons and pressed them on the wet Mod Podge to dry. After the Mod Podge layer was dry we glued a magnet to the back of each lid. Materials Needed - soup can lids, tissue paper, glue stick, Mod Podge, paint brushes, magnets, craft glue, buttons

Monday, July 12, 2010

Button Letters!


Day 1 of the Week. The theme this week is Fun with Buttons!
Project - Button Letters. I thought it would be fun to make a keepsake for Addie and Caitlyn to hang in their rooms. So, I went to the website http://www.coloringcastle.com/ and printed off a capital A for Addie and a C for Caitlyn. I cut each letter out and glued them to a piece of 8x8 white card stock. Next, I covered the letters with craft glue. Caitlyn and I used buttons to cover the letters. Caitlyn covered her C with buttons and covered Addie's A with buttons. I am going to frame the letters in a shadow box frame. I am going to hang Addie's letter in her new room - it should look cute with her yellow walls! :) Materials Needed: white card stock, block letter template, buttons, craft glue, scissors, frame (optional)
C for Caitlyn and A for Addie!

Friday, July 9, 2010

Tie-Dye Fun!

Day 2 of the week. The theme this week is Things to Wear!
Project - Tie-Dye Fun! We started this project on Tuesday,but our first batch of shirts were a bust, so we tried again. The second round we were more patient with and made sure to follow the directions completely. All of the shirts turned out great. I should know by now to always follow directions and be patient!! My sister Kinsey helped me with this project. She loves to Tie-dye! The kids love their shirts and we do too. :) Directions: Buy Rit Dye in a variety of colors and follow the directions on the box. We used Tie-dye design directions from the August 2008 issue of Family Fun Magazine. http://www.familyfun.com/ We did the bull's eye, diagonal stripe, rosette, swirl and crinkle designs. Materials Needed - white shirts, rubber bands, 5 gallon buckets, hot water, stir sticks, rubber bands, Rit Dye, detergent, salt

The shirts all ready to be dyed


Caitlyn and Connor dyeing their shirts


The shirts dyed and all wrapped up


2 more of the finished shirts

Thursday, July 8, 2010

Button Barrettes!

Day 1 of the week. The theme this week is Things to Wear.
Project - Button Barrettes. I found some old barrettes/clips. Caitlyn and I applied a thin layer of craft glue to the top of each barrette. Caitlyn chose colorful buttons and glued the buttons to the top of the barrettes. The colorful barrette is Caitlyn's and the pink barrette is Addie's. Materials Needed - barrettes, craft glue, buttons