Thursday, December 20, 2012

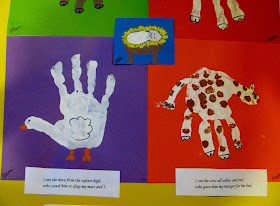
The Friendly Beasts Handprints

 
The Friendly Beasts
My Church School class is performing The Friendly Beasts for their part in the youth Christmas program this year.  I had my 5 youngest students use their handprints to represent the animals in The Friendly Beasts song.  I printed off words to go above each animal.
 
I am the donkey shaggy and brown, who carried Mary to Bethlehem town.
I am the sheep with the curly horn, who gave him my wool for a blanket warm.
 
 
We used an open handprint for the dove.  We should have used a closed hand with the thumb pressed out!

I am the dove from the rafters high, who cooed him to sleep my mate and I.
I am the cow all white and red, who gave him my manger for his bed.


Wednesday, December 19, 2012

Handprint Wreath

Paint hands green and press onto white paper, palms in forming a wreath shape.  Let dry.  Use fingers to add red "berries" with red paint.  Let dry and add a red bow!
Materials Needed:  green and red paint, white paper, red ribbon

Tuesday, December 18, 2012

Cork Reindeer

Cork Reindeer!
Thread a 1 inch piece of gold wire through a red bell and secure into the bottom of a wine cork.  Bend two pieces of 6 inch wire into antlers and push into the top of the wine cork.  Glue on googly eyes.  Cut ears from brown and pink foam and glue onto the sides of the wine cork.  Add a hook for hanging.
Materials Needed:  wine cork, red bell, googly eyes, brown and pink foam, gold wire, scissors, glue, hook

Friday, December 14, 2012

Beaded Reindeer

Cut a gold pipe cleaner into an 8 inch piece and two 2 inch pieces.  String 16 brown beads on the 8 inch gold pipe cleaner.  Form it into a circle and twist ends to secure.  Twist the two, 2 inch pieces to make the antlers.  Glue on googly eyes and a red bell or pom pom for the nose.  Add a hook to hang on your tree!
Materials Needed:  gold pipe cleaner, brown beads, scissors, glue, googly eyes, red bell or pom pom 

Saturday, December 8, 2012

Footprint Christmas Tree!

Paint feet green and toes red.  Press painted foot on white paper and then the other foot on the paper overlapping the heels of the feet.  Add a brown trunk and a yellow star! 
Materials Needed:  green, red paint, yellow, brown marker, paintbrush and white paper

Thursday, November 22, 2012

Turkey cookies and I am thankful for . . . .

Turkey cookies! 
Connor and Addie helped me make these cookies for Connor's class.  They were gobbled up really fast. :)


I am thankful for . . . .
Connor made one of these when he was 4, so now it is Addie's turn.  She has a lot to be thankful for.  She even wrote all of the words on the feathers!

Monday, November 19, 2012

All About Turkeys!

In honor of the upcoming holiday of Thanksgiving, we have been making turkey projects.  Tana asks to make a "turkey craft" every day.  Here are few that we have done this November
 
Noodle Turkey
 
We dyed spiral noodles in zip-lock baggies.  I have never done this before, but it was super easy.  Just put the desired amount of noodles into separate zip-lock bags, add 3/4 tsp - 1 tsp of white vinegar and shake (don't add too much you don't want the noodles to get soggy). add 4-5 drops of food coloring to each bag and shake until the noodles are coated and colored.  Dump the colored noodles onto cardboard to dry. 
Noodle Turkeys:  cut a turkey shape out of brown construction paper and glue it to a piece of sturdy tag board or card stock.  Add a beak, waddle, and eyes.  Then glue the colored noodles to the turkey for feathers!  (We used craft glue)
Materials Needed:  card stock, glue, red, orange construction paper,  scissors, noodles,  zip-lock bags, white vinegar, food coloring, cardboard
 
Name Turkey
 
We made this turkey, because I am teaching Tana how to verbally spell her name, and it was great writing practice for Addie! 
Name Turkey:  Cut a turkey head shape out of brown construction paper.  Cut feathers out of different colored construction paper - Each turkey will be different depending on the length of the child's name.  Cut a beak and waddle out of orange and red construction paper  Apply glue to the bottom half of the head and stick it to the blue construction paper.   Glue the feathers to the blue construction paper - arranging the feathers so they fit behind the head.  Apply glue to the rest of the head and stick it to the paper.  Glue on the beak, waddle and googly eyes.  Have your child stick their appropriate letters from their name to each feather.  If your child can write their own name have them write the letters from their name on each feather!
Materials Needed:  blue construction paper, brown construction paper, scissors, various colors of construction paper, glue, googly eyes, foam letters or a marker.
 
Hand and Footprint Turkey
Tana loved making this turkey - she loves to have her hands and feet painted! 
Hand and Footprint Turkey:  Paint the child's hands and press onto the paper in a fan like pattern.   Paint the child's foot brown and press onto white cardstock or paper in the middle of the handprints.  Let dry and then add googly eyes, beak &waddle.  I used chenile stems to make the beak & waddle. 
Materials Needed:  white cardstock or paper, brown, red, orange, yellow, blue paint, paintbrush, craft glue, googly eyes, red and orange chenile stem, scissors 

Friday, November 9, 2012

Turkey Magnets!

Trace a soup can lid onto brown, craft foam and cut it out.  Glue the foam circle to the lid.  Glue craft feathers to the back of the lid.  Glue on googly eyes, orange, chenille stem beak and red, chenille stem gobbler!  Add a magnet to the back!  So simple and cute!
Material Needed:  soup can lid, brown craft foam, glue, scissors, craft feathers, orange and red chenille stems, googly eyes

Thursday, November 1, 2012

Jack-O-Lantern Magnet

Trace the lid from a tin can on orange craft foam.  Cut out the circle and glue to the lid.  Decorate the orange, craft foam with stickers, craft foam pieces or anything else.  Glue a magnet to the back!
Materials Needed:  tin can lid, glue, orange craft foam, pencil, scissors, stickers, craft foam , marker . . . .

Friday, October 26, 2012

Witch Faces!

I had green, dessert plates left-over from a birthday party.  I thought they would be perfect to use for witch faces.  We used a lot of our scrap, sparkly foam left overs.  The eyes are actually the adhesive, foam, letter O's!  The noses are scrap, sparkly, green, adhesive, craft foam pieces.  I punched three holes on the side of each plate and pushed pipe cleaners through the holes and twisted them to make hair.  Addie and Tana picked out the hair and hat colors for this fun project! 
Materials Needed:  green, paper, dessert plate, craft foam in various colors, pipe cleaners, and hole punch

Monday, October 22, 2012

Small, Ghost Windsock!

Addie cut and pasted a ghost face onto a small 5x7piece of white paper.  On the back side of paper Addie glued on strips of Crepe paper.  Next, we rolled the piece of paper to form a ghost cylinder.  I helped Addie secure the edges with tape.  We also added white yarn for hanging!
Materials Needed:  white paper, glue, black paper, scissors, crepe paper, yarn, tape

Thursday, October 18, 2012

Cardboard Tube Jack-O-Lanterns!

Paint a cardboard tube orange.  Once it is dry glue on button eyes and nose.  Stick on craft foam mouth.  We used Sparkly letter U's!  Punch two holes in the top of the tube and push a green pipe cleaner through the holes.  Twist the pipe cleaner to form the stem. 
Materials Needed:  cardboard tube, orange paint, paintbrush, buttons, craft foam, glue, hole punch, green pipe cleaner

Tuesday, October 9, 2012

Paper Plate Ghost

Addie and her ghost!
Paper Plate Ghost! 
Cut out two medium size circles from black construction paper and one medium oval from black construction paper.  Glue the circles and oval to the back of a paper plate to make a ghost face.  Glue white streamers, cut into 12 inch lengths to the bottom of the plate.  Cut hands/arms for the ghost from white paper or white craft foam and secure the plate with either glue or staples.  Add a piece of ribbon for hanging!  Material Needed:  paper plate, black construction paper, scissors, glue, white streamers, white paper or white craft foam, stapler, ribbon

Wednesday, October 3, 2012

Mini - Styrofoam Ghost

Paint a mini pot white.  Let it dry.  Glue a white Styrofoam ball to the bottom of the painted pot.  Draw eyes and mouth on the Styrofoam ball with a black permanent marker.  Cut wings/arms out of white foam and hot glue to the painted plant. 
Materials Needed:  white paint, Styrofoam ball, black permanent marker, white craft foam, scissors, mini pot, hot glue or craft glue

Friday, September 28, 2012

Fall Handprint Tree


I painted a tree trunk for Joey and Tana. Addie painted her own tree trunk.  Next I painted their hands and pressed them onto the paper to make a fall tree!  They used their fingers to make fallen leaves on the bottom of the paper.
Materials Needed:  red, orange, yellow, green  and brown paint, paint brush, white paper

Tuesday, September 18, 2012

Fall Fingerprint Tree!

Addie's Tree,
Chase's Tree and Tana's Tree
 
I cut out a trunk shape from brown construction paper.  Addie glued the trunk to a piece of white construction paper.  I helped Chase and Tana with their tree trunks!  Next the three children dipped their fingers into the red, yellow and orange paint and pressed their fingers on, above, below and around the tree trunk to make colorful, Fall leaves! 
Materials Needed:  white and brown construction paper, red, yellow and orange paint

Monday, September 17, 2012

Fall Leaves Plaque

Addie's Fall Plaque!
 
I made a half batch of salt dough, and cut it into circles.  Addie, Tana and Joey pressed leaf cookie cutters into the dough.  I baked the plaques at 225 degrees for 2 hours and then let them cool.  Addie and I mixed orange paint with sparkly gold glitter and then Addie, Ty and Joey painted their Fall plaques! 

Wednesday, September 12, 2012

Pink-Pig Puppet!

This is such a cute, easy project to do with any age.  First paint a large craft stick pink - let dry.  Then glue on googly eyes, a pink button nose and two pink, felt ears.  Draw eyebrows with a black, permanent marker and you are done.  This wonderful idea is borrowed from makeandtakes.com

Chase and Addie with their Pigs

Wednesday, September 5, 2012

Hand Print Chicken

Here is another cute project from funhandprintart.blogspot.com  This chicken handprint was so easy and cute.  Tana, Addie, Ty and Chase did this project.  They added a head to the handprint along with the eyes, beak and feet!

Tuesday, September 4, 2012

Pig Footprint

I read Three Little Pigs to the kids and then we made this adorable pig project!  I saw this cute footprint at Funhandprintart.blogspot.com   There are great foot and handprint crafts on her site - check it out!!  She even featured my rooster handprint from a couple of years back.  This pig was fun to make - the kids love having their feet painted! 
Tana's, Ty's and Addie's Pig Footprints!

Tuesday, August 21, 2012

Princess Birthday Party!

Addie's 4th Birthday - A Princess Party!

 I made a Birthday Banner out of pink and purple scrap booking paper.  I cut the paper into triangles and added glittery, foam letters to spell out Happy Birthday.  Then Addie and I added sparkly princess themed foam stickers to each triangle.  I found the foam stickers at Wal-Mart.  Next, I punched holes in the corners of the triangles and strung pink ribbon through the holes. 


I made a two tiered birthday cake and frosted it with purple frosting and added pink flowers for contrast. Addie picked out her favorite tiara and wand and we added it to the cake. I cut number 4 from pink craft foam and added it to the front. This is not my best cake - but my sister and I got a good laugh out of it when we were frosting it at midnight the night before. I will forever think of this as the purple hippo cake!! :)


I made tulle princess wands for the little guests. This party had more boy guests than girl guests, so I made yellow, brown and white wands in addition to the adorable pink wands. I got this idea and directions from mydecoupagedlife She has such wonderful ideas and these tulle pom pom wands were super easy to make!!

Friday, August 3, 2012

Olympic Medals!

Olympic Medals! 
We made our own version of Olympic Medals.  I mixed up some salt dough and added blue and red glitter to the mixture.  Next, I rolled the dough into balls and flattened to make disc shapes for the medals.  Then I let the kids decorate their medals with gems, and sparkly stones!  I used a straw to make a hole in the top for the ribbon to go through.
Materials Needed:  Salt Dough recipe, yarn or ribbon, gems or sparkly stones, glitter

Tuesday, July 31, 2012

Olympic Torch

Olympic Torches
Roll white paper into a cone and secure with tape.  Cut pieces of red, orange and yellow tissue paper into 8 x 8 squares.  Layer the pieces of tissue paper on top of one another.  Grab the stack in the middle and hold and arrange the tissue paper like a bouquet of flowers.  Put glue on the inside of the cone and press the tissue paper bouquet in. 
Materials Needed:  white paper, tape, red, orange and yellow tissue paper, scissors, glue

Monday, July 30, 2012

Olympic Rings!

Olympic Rings: I saw this easy, cute project on makedoandfriend.com . Dip the ends of cardboard tubes into blue, black, red, yellow and green paint to form the olympic rings!  The kids had fun doing this easy Olympic themed project!
Materials Needed:  5 cardboard tubes, blue, black, red, yellow and green paint, white paper

Thursday, July 19, 2012

Shell Plaque

I found the original idea for this project in the August 2012 issue of Family Fun Magazine.   We used sea shells and rocks instead of pebbles
Addie's Plaque                                                                    Ty's Plaque


Directions: Mix up the salt dough - 3 cups of flour, 1 cup of salt, 1 1/4 cups of water (plus up to an additional 1/4 cup as needed). Use an electric mixer on medium speed to beat the ingredients together until a ball forms. If the mixture is still crumbly, add more water. Knead the dough until it's smooth. Divide the dough into three balls. Place each ball on a piece of foil and flatten it into a disk. Press shells (the magazine used pebbles) into the dough to create a design. Heat the oven to 275 degrees. Transfer the  and dough onto a baking sheet. Bake the plaques for 2 hours, then let them cool completely.
                                                               Connor's Plaque

Tuesday, July 17, 2012

Flying Creatures


Cover a paper cup with a piece of blue paper - secure it with a tape or glue, and trim the edges.  Use foam circles to decorate the outside of the cup.  Glue on googly eyes and draw a mouth with marker.  Cut strips of tissue paper and tape to the inside of the cup.  Tape a long loop of ribbon at the top end of the cup so you hang it up. 

Materials Needed:  paper cup, blue construction paper, foam circles, strips of tissue paper, black marker, googly eyes, ribbon, glue, tape, scissors

Tuesday, July 10, 2012

Craft Stick American Flag

Craft Stick American Flag:  Glue 2 red and 2 natural colored craft sticks to a piece of cardboard.  Cut 2-inch pieces from 3 red craft sticks and 2 natural craft sticks.  Cut 2 1/2-inch sections from 5 blue craft sticks and arrange and glue into an American flag.  Use a paint brush and white paint to add "stars" to the blue craft sticks.  Let dry, and trim off excess cardboard!
Materials Needed:  5 red craft sticks, 4 natural craft sticks, 5 blue craft sticks, paintbrush, white paint, craft glue, cardboard

Friday, July 6, 2012

Firecracker Crowns!

Firecracker Crowns! 
This project comes from the July/August issue of Family Fun Magazine
Directions:  Arrange 5 red and 5 white 2 1/2- by 12- inch craft foam strips side by side, alternating the colors.  Apply a 26-inch strip of blue tape across the panels about 1 inch from the bottom, wrapping the ends around to the back.  Decorate the tape with sticker stars or any other fun, festive shape.  Cut a 1/2-inch wide fringe in each panel starting from the top and ending just above the tape. 

Flip over the fringed foam and position a gold pipe cleaner in the center of each of the inner 8 panels so that the lower end is about an inch below the fringe.  Tape them in place. 
When your child is ready to wear the crown, wrap it around his/her head, overlapping the ends and securing them with a large paper clip!
Materials Needed:  white and red craft foam, scissors, blue tape, foam sticky stars, gold pipe cleaners

Thursday, June 14, 2012

Folded Caterpillar/Butterfly


Folded Caterpillar/Butterfly
Draw a caterpillar shape onto a folded piece of card stock.  Make sure the "back" of the caterpillar is on the fold.  Draw a face for the caterpillar with black marker.  Color the caterpillar.  Open the caterpillar to the butterfly.  Glue squares of colored tissue paper to the butterfly.  Draw a butterfly body in the center. 
Materials Needed:  white card stock, black marker, crayons, scissors, colored tissue paper

Wednesday, May 30, 2012

Craftstick Flowers!

We did this project before when Connor was younger.  These flowers were such a cute a project I wanted Ty and Addie to make them. 
Directions:  Project- Popsicle Stick Flower-  I found this idea in the March 2009 issue of Parents Magazine. Ty and Addie picked out the colors they wanted their Pop-Art flowers to be. They then arranged the sticks in a layered circular pattern. I then helped them glue the sticks together. The green popsicle stick (the stem) goes in the middle of the floral design so the flowers look 3-D!
Materials - 8 colored Popsicle sticks, 1 or 2 green Popsicle sticks for the stem, and glue (either craft glue or hot-glue).


Wednesday, May 16, 2012

Mother's Day Gifts!

Here are the gifts that my 2 daycare kids made for their mom! 
Mother's Day Questionnaire
Ty answered questions about his mom.  I typed out the questions and answers and he illustrated the Mother's Day questionnaire!  I added buttons to the corners and mounted the paper to yellow card stock. 
 Tana's Handprint Poem
I printed out the poem and painted Tana's hand and pressed it onto the paper.  I framed the poem and handprint as a keepsake.

Thursday, May 10, 2012

Sprouting Seedling Cupcakes!

This adorable treat comes from the April 2012 issue of Family Fun Magazine. 
Directions:  Bake cupcakes in paper liners and frost them with chocolate frosting.  Crush chocolate cookies -(we used Chocolate filled Oreos) into crumbs and dip the frosted cupcakes into them.  Use a toothpick to make a hole int he center of each cupcake top.  To make the sprouting seedling, roll a green fruit chew candy ( we used green Airheads.  I ripped the Airhead into pieces.  The magazine used Jolly Rancher Fruit Chews) into a cylinder and taper the ends.  With a toothpick, make a line down the center and fold the cylinder in half and shape it to make a v shaped seedling.  Then insert it into the cupcake.  The magazine put the cupcakes, in clean 2 3/4" wide terra -cotta pots.  I didn't have any, so we didn't do this. 

Materials Needed:  cupcakes, chocolate frosting, chocolate cookies, cupcake liners, green chewy candies, toothpick